 how-to
SmartShunt Setup for Beginners: A Step-by-Step Guide
Table of Contents
- What You'll Need Before Starting
- Understanding SmartShunt Installation and Wiring
- VictronConnect App Setup and Bluetooth Pairing
- Configuring Victron SmartShunt Lithium Settings
- SmartShunt State of Charge Calibration
- Common Setup Mistakes to Avoid
- Troubleshooting Your First Connection
- Next Steps: Monitoring Your Battery System
- Frequently Asked Questions
Last Updated: October 7, 2026
What You'll Need Before Starting
Setting up a Victron SmartShunt for beginners requires just the SmartShunt, a smartphone or tablet running the VictronConnect app, and simple hand tools.
Before you start, gather these items:
- Victron SmartShunt battery monitor
- VictronConnect app (free download for iOS or Android)
- Wire strippers and crimpers
- Appropriately sized battery cables
- Torque wrench (10mm socket recommended)
- Smartphone or tablet with Bluetooth capability
No special technical knowledge is needed, most people finish in under an hour.
Charge your battery bank fully before beginning, this matters for calibration later, and turn off all loads during installation to avoid accidental shorts.
Understanding SmartShunt Installation and Wiring
The SmartShunt is a current shunt, a traffic counter for electricity, that sits between your battery's negative terminal and everything else, monitoring every amp in or out.
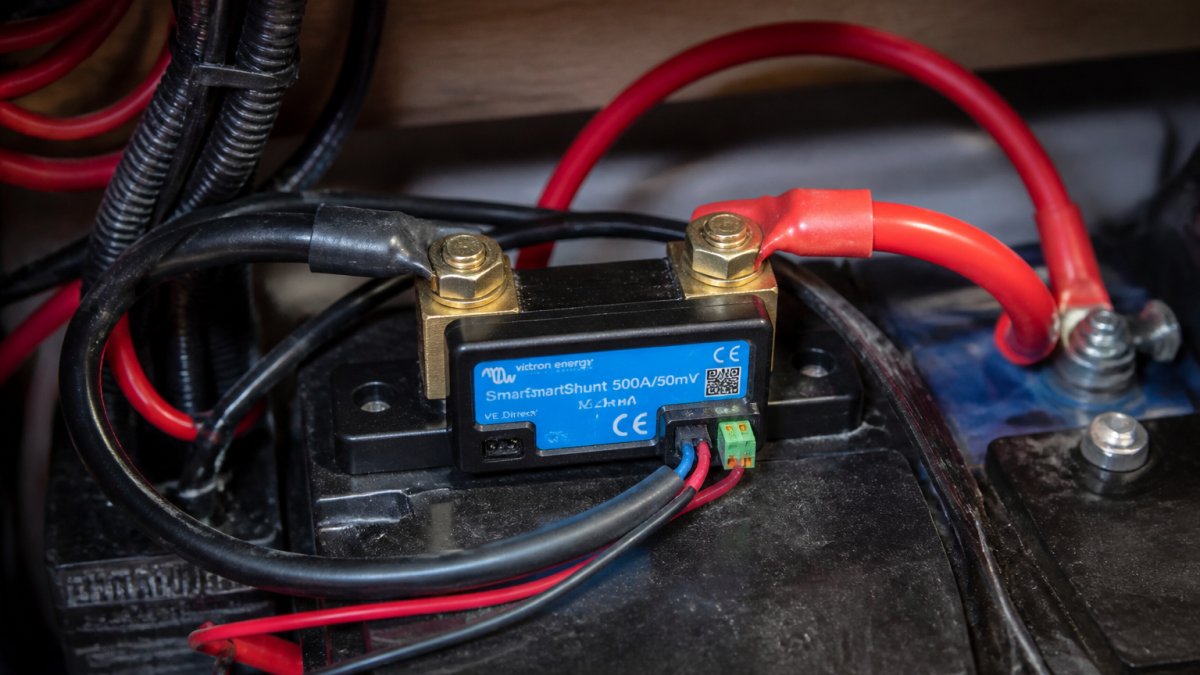
Positioning the Shunt in Your Battery System
Never place it on the positive side or in series with other components, it needs a direct, unobstructed path to measure accurately.
Mount it as close to the battery negative terminal as possible to minimize voltage drop, using a sturdy bracket to prevent vibration from loosening connections.
If you're running multiple battery banks, you'll need a shunt for each one. The Victron SmartShunt setup works independently for each battery bank you're monitoring.
Connecting the Battery Negative Terminal
Strip about 0.5 inches of insulation from your battery negative cable and slide it into the shunt's negative input terminal.
Tighten the terminal bolt to the manufacturer's specification (typically 10-12 Nm), a loose connection gives false readings and safety issues.
The battery negative cable connects to the shunt's system side terminal, where all loads and chargers connect downstream.
Double-check connections before powering on, reversed polarity can damage the SmartShunt and your entire system.
VictronConnect App Setup and Bluetooth Pairing
The VictronConnect app shows state of charge, current flow, voltage, and historical data in one place.
Downloading and Installing VictronConnect
Search your app store for "VictronConnect", free on iOS and Android. Download the official Victron Energy version.
Create a Victron account if you don't have one to access system data remotely.
Local Bluetooth monitoring works offline; cloud features require internet.
Pairing Your Device and First Connection
Turn on Bluetooth, open VictronConnect, and tap "Add Device."
Your SmartShunt should appear within seconds, tap it to pair.
On first pairing, enter the default PIN from the documentation (usually 000000).
Once paired, the app displays real-time voltage, current, and state of charge.
If pairing fails, restart both devices and confirm Bluetooth is on and you're within 30 feet.
Configuring Victron SmartShunt Lithium Settings
The SmartShunt needs to know your battery type, lithium, lead-acid, and AGM all charge and discharge differently, and wrong settings cause inaccurate readings, premature low-voltage disconnects, or battery damage. Enter manufacturer-recommended values instead of guessing.
Selecting Battery Chemistry and Capacity
In VictronConnect, open your SmartShunt, tap the gear icon, then Battery. Set Battery capacity to the bank's total amp-hour rating: two 100 Ah batteries in parallel is 200 Ah; in series it's still 100 Ah at double the voltage. Enter the data-sheet number, a 200 Ah bank entered as 180 Ah reads 100% with 10% usable capacity left.
There is no single "Lithium" toggle. Instead you set the parameters that define how the shunt decides the battery is full:
- Charged voltage, the voltage the shunt must see, while current is low, before it will declare the battery full.
- Tail current, the current threshold (as a percentage of capacity) that counts as "fully charged."
- Charged detection time, how long both conditions must hold before the shunt synchronizes to 100%.
- Peukert exponent, how much usable capacity shrinks at higher discharge rates.
- Charge efficiency factor, how much of the energy you put in actually gets stored.
Chemistry-Specific Starting Values
Use these as starting points, then override with your battery manufacturer's data sheet. Manufacturer values always win.
LiFePO4 (most common lithium chemistry):
- Charged voltage: 0.2V below your charger's absorption voltage. If your charger absorbs at 14.2V on a 12V system, set charged voltage to 14.0V.
- Tail current: 4% of capacity. On a 200 Ah bank, that's 8A.
- Charged detection time: 3 minutes.
- Peukert exponent: 1.05.
- Charge efficiency: 99%.
Flooded lead-acid:
- Charged voltage: 0.2V below absorption, typically 14.4V on a 12V system.
- Tail current: 2% of capacity.
- Charged detection time: 3 minutes.
- Peukert exponent: 1.25.
- Charge efficiency: 85%.
AGM:
- Charged voltage: 14.4V on a 12V system (check the data sheet, some AGMs want 14.6V).
- Tail current: 2% of capacity.
- Charged detection time: 3 minutes.
- Peukert exponent: 1.15.
- Charge efficiency: 90%.
Gel:
- Charged voltage: 14.1V on a 12V system.
- Tail current: 2% of capacity.
- Charged detection time: 3 minutes.
- Peukert exponent: 1.15.
- Charge efficiency: 90%.
Where to Find Manufacturer Values
Every reputable battery maker publishes a charge profile. Look for:
- The technical data sheet or spec sheet on the product page.
- A charging instructions PDF, often linked separately from the spec sheet.
- The label on the battery itself, which usually lists absorption and float voltages.
If you can't find charged voltage, tail current, or Peukert for your battery, use the chemistry defaults above and verify against the manufacturer's absorption and float numbers. Charged voltage and tail current matter most for SOC accuracy.
Lithium BMS Integration
Many LiFePO4 batteries ship with a BMS that talks to Victron gear over CAN bus or VE.Can. When that link is active, the BMS supplies charge parameters directly, don't override them in the SmartShunt. If your battery has a communications port and your system includes a Victron GX device (Cerbo GX, Ekrano GX, or similar), wire the BMS to it and let it drive charged voltage and tail current. Without a GX device, set the parameters manually.
SmartShunt State of Charge Calibration
State of charge is the percentage of energy remaining. The SmartShunt doesn't measure SOC directly, it counts amp-hours in and out and re-anchors to 100% when it detects a full charge.
How Synchronization Actually Works
The SmartShunt declares the battery full when three conditions hold at once:
- Battery voltage rises above the charged voltage you set.
- Charge current falls below the tail current threshold (a percentage of capacity).
- Both conditions hold for the charged detection time (usually 3 minutes).
When all three are true, the shunt resets its amp-hour counter to zero and sets SOC to 100%, then tracks every amp in and out continuously. If any condition is misconfigured, synchronization never fires and SOC drifts.
Initial Synchronization at Full Charge
Charge completely using your normal source, solar, shore power, alternator, or generator. "Completely" means the charger reached absorption voltage and current tapered to the tail current threshold.
Once genuinely full, open VictronConnect, tap the SmartShunt, then Settings → Battery → Synchronize to force SOC to 100%. You only need this manually the first time; afterward it synchronizes automatically when the conditions are met.
Verifying Readings After Installation
Do not assume the setup is correct because the app shows numbers. Run these checks over the first few days:
Voltage check. Compare a multimeter on the battery terminals to the SmartShunt's reading, they should agree within 0.1V. A larger gap usually means a loose or corroded connection at the B+ sense wire or main negative cable.
Current direction check. Turn on a known load, a 12V fridge, small inverter load, or headlight.
Current magnitude check. A 10A load should read roughly 10A.
SOC drop check. On a 200 Ah bank, drawing 20 Ah should drop SOC about 10%.
Time-to-go check. Compare the SmartShunt's runtime estimate to your own math (remaining Ah ÷ current draw).
What to Do When Readings Drift
SOC drift is normal over weeks if the battery never reaches a true full charge, say, an off-grid system running a deficit for days. Run a full charge cycle so the shunt re-synchronizes. If drift persists, recheck charged voltage and tail current against the data sheet; a common cause is setting charged voltage equal to the charger's absorption voltage.
Common Setup Mistakes to Avoid
Reversed polarity is the most dangerous mistake, verify positive to positive and negative to negative before powering on.
Loose connections cause inaccurate readings and voltage drop. Torque firmly and check monthly for corrosion or loosening.
Wrong battery chemistry breaks SOC accuracy, lithium and lead-acid charge very differently. Verify your type before configuring.
Skipping synchronization means the SmartShunt doesn't know what full charge looks like.
Troubleshooting Your First Connection
If the app won't connect, restart both devices and move within Bluetooth range (typically 30 feet).
No data usually means a loose cable connection, check and tighten all terminals at the shunt and battery.
SOC stuck at 0% or 100% means synchronization didn't complete, charge fully and repeat the synchronization process.
Backward current readings (negative when charging, positive when discharging) indicate reversed polarity, power down immediately and reverse the connections.
Next Steps: Monitoring Your Battery System
Check SOC regularly, especially in the first few weeks, to understand your consumption and charging patterns.
Set up VictronConnect notifications for low SOC to get alerted before power runs out.
Review historical data weekly for charging and discharge trends, this spots problems early and helps optimize your system.
Getting your Victron SmartShunt running smoothly takes just a few hours of setup work.
Frequently Asked Questions
What are the recommended settings for Victron SmartShunt lithium batteries?
For lithium batteries, configure the battery chemistry setting to LiFePO4 (or your specific lithium type) in VictronConnect. Set absorption voltage according to your battery manufacturer's specifications, typically 3.4-3.5V per cell. Float voltage is usually 3.25-3.3V per cell. Disable equalization, as lithium batteries don't require it. Always verify your battery's exact voltage and current limits in the manufacturer documentation before applying settings to avoid damage to expensive lithium systems.
How do I calibrate my SmartShunt state of charge?
Fully charge your battery bank to 100% and leave it in float mode for at least 30 minutes to stabilize voltage. Open VictronConnect, navigate to the battery monitor settings, and tap the synchronization option at the voltage that matches your float voltage. This tells the monitor that the battery is truly full. The SmartShunt will then track amp-hours consumed and discharged from that point. Recalibrate every few months or after a full charge cycle for accuracy.
Why does my SmartShunt show inaccurate state of charge?
Inaccurate readings usually mean the monitor hasn't been synchronized since installation or after a power loss. Synchronize the device at full charge using VictronConnect. Also check that the correct battery capacity (amp-hours) is entered in settings, an incorrect capacity value will cause the monitor to calculate state of charge incorrectly. If you've recently changed charger settings or added loads, allow the system to stabilize for 24 hours before expecting accurate readings.
Where should the SmartShunt be installed in a battery system?
Install the SmartShunt on the negative cable between the battery bank and all system loads and chargers. The shunt measures all current flowing in and out of the battery, so it must be on the system side of the battery negative terminal, not on the charger side. This placement ensures accurate monitoring of both charging current from solar or shore power and discharge current to your loads. Poor shunt placement will cause the monitor to miss current and report false state of charge.