 blog
blog
Best Lithium Battery Monitoring Systems
Table of Contents
- What You Need to Know About Lithium Battery Monitoring
- Why Monitoring Matters for Lithium Systems
- Shunt-Based vs Voltage-Based Battery Monitors
- How to Calibrate a Battery Monitor for Lithium Iron Phosphate
- Best Bluetooth Battery Monitor for RV and Marine Use
- Installation, Wiring, and Real-Time Data Tracking
- Troubleshooting Common Monitoring Issues and Error Codes
- Frequently Asked Questions
Last Updated: September 28, 2026
What You Need to Know About Lithium Battery Monitoring
Lithium battery monitoring systems are specialized devices that track the state of charge, voltage, amperage, and overall health of lithium iron phosphate (LiFePO4) batteries in real time. Unlike lead-acid batteries that tolerate overcharging and deep discharge cycles, lithium systems require precise monitoring to prevent damage, extend cycle life, and maintain safety. At Victron Guy, we understand that proper monitoring isn't optional, it's the foundation of a reliable off-grid power system.
A lithium battery monitoring system acts as the nervous system of your electrical setup. It continuously measures current consumption, voltage accuracy, and depth of discharge, then communicates this data to you via display screens or mobile apps. This real-time tracking prevents the two biggest threats to lithium batteries: overcharging and over-discharging. When you know exactly how much power you're drawing and how much capacity remains, you can make informed decisions about appliance use before your system fails.
The challenge most RV owners and off-grid homeowners face is choosing between shunt-based monitors and voltage-based alternatives, then installing and calibrating the system correctly. Many DIY builders skip proper setup because they don't understand what each monitoring approach actually measures or how to interpret the readings. This guide walks you through the core concepts, installation fundamentals, and troubleshooting steps you need to select and configure the right lithium battery monitoring system for your specific electrical load.
Why Monitoring Matters for Lithium Systems
Lithium batteries operate within tight tolerances that traditional lead-acid systems never required. Pushing a lithium battery beyond its safe voltage range, either too high during charging or too low during discharge, can trigger internal protection circuits or cause permanent damage. A quality battery monitor prevents this by alerting you before those limits are approached.
Real-time tracking also extends cycle life dramatically. Most lithium batteries are rated for 3,000 to 5,000 cycles when used within specification. Exceeding the depth of discharge limit or allowing the battery to sit in a deeply discharged state cuts that number in half. A monitor shows you exactly how deep you're discharging on each cycle, letting you adjust your power consumption habits to stay within the safe zone.
Beyond protection, monitoring gives you visibility into system efficiency. You'll see how much current your DC-to-DC charger is pulling, whether your MPPT controller is charging at full capacity, and which appliances consume the most power. This data reveals inefficiencies, a parasitic load draining power overnight, a charge controller undersized for your solar array, or an inverter inefficiently powering small loads. Once you spot these issues, you can fix them.
Shunt-Based vs Voltage-Based Battery Monitors
The difference between these two approaches comes down to how they measure state of charge. A shunt-based monitor uses coulomb counting: it measures the actual current flowing in and out of the battery through a low-resistance shunt, then calculates remaining capacity based on accumulated charge. A voltage-based monitor estimates state of charge by measuring battery voltage alone.
Shunt-based monitors are more accurate because they directly measure amperage. They track every amp flowing into and out of the battery, calculating remaining capacity with precision. This approach works well for systems with multiple charge sources (solar, alternator, shore power) because the shunt sees all incoming current. Shunt-based systems typically come in 50-amp, 100-amp, 200-amp, and 500-amp ratings, the amp rating determines the maximum current the shunt can safely measure. For a small RV with 100 amps of solar and a 200-amp lithium battery, a 200-amp shunt provides adequate headroom. For a large marine system running AC loads and multiple charge sources, a 500-amp shunt prevents the monitor from maxing out during peak loads.
Voltage-based monitors estimate state of charge by reading battery voltage. Since lithium voltage curves are steep, the voltage drops significantly as you discharge, the monitor can estimate remaining capacity. These systems are simpler to install (no shunt wiring required) and less expensive. However, voltage readings alone don't account for temperature effects, cell imbalances, or the battery's internal resistance, so the state of charge estimate drifts over time. Voltage-based monitoring works adequately for small systems where you're already conservative with discharge depth, but it's less reliable for systems where you need to know exactly how much usable power remains.
For most RV and marine applications, a shunt-based monitor paired with a quality display or Bluetooth app provides the accuracy needed to maximize battery life and prevent surprises. The installation complexity is worth the precision.
How to Calibrate a Battery Monitor for Lithium Iron Phosphate
Calibration is where most DIY installers stumble. A properly calibrated monitor reads state of charge accurately; a miscalibrated one drifts toward false readings within weeks. The calibration process depends on your specific monitor model, but the fundamental steps are consistent.
Start by fully charging your lithium battery system to 100% state of charge. This means the charger has completed its absorption phase and the battery voltage has stabilized at the manufacturer's specified maximum (typically 3.65V per cell for LiFePO4, or about 58.4V for a 16-cell pack). Once the battery sits at this voltage for at least 30 minutes with no charging current flowing, record the voltage reading on your monitor. This is your reference point for full charge.
Next, discharge the battery to a known low point, typically 20% depth of discharge, which leaves 80% capacity remaining. Some monitors let you manually set this calibration point. Others require you to use a load test where you draw a measured amount of current over a known time period, then calculate the amp-hours consumed. The monitor uses this information to calibrate its coulomb counting algorithm.
If your monitor has a Bluetooth app, the calibration interface is usually straightforward: the app walks you through the process and stores the calibration data in the monitor's memory. If you're using a hardwired display, you'll navigate menu options on the screen to enter voltage and capacity values. Consult your monitor's manual for the exact steps, different brands (Victron, Battleborn, Relion) have different interfaces.
After calibration, avoid making major system changes for at least one full charge-discharge cycle. The monitor needs this cycle to validate the calibration and adjust its internal models. If you add solar panels, upgrade your charger, or change your battery capacity after calibration, you'll need to recalibrate to maintain accuracy.
Best Bluetooth Battery Monitor for RV and Marine Use
Remote monitoring via mobile app has become standard for serious off-grid builders. A Bluetooth-enabled lithium battery monitoring system lets you check your state of charge, voltage, and current consumption from inside your RV or cabin without walking to the battery bank. This is especially valuable on boats where the battery is below deck, or in RVs where the battery is mounted in a hard-to-access compartment.
The best monitors for RV and marine applications combine accurate shunt-based measurement with reliable Bluetooth connectivity and an intuitive app. Look for monitors that display real-time amperage and voltage, track cumulative amp-hours consumed, and show historical data logging so you can identify patterns in your power usage. Some monitors integrate directly with smart home ecosystems or MPPT controllers, allowing you to see your full system status in one app.
When selecting a Bluetooth monitor, verify that it's compatible with your specific battery chemistry (LiFePO4 requires different voltage thresholds than lead-acid). Confirm the shunt capacity matches your maximum expected current draw, a 200-amp shunt will saturate if you try to run a 3,000-watt inverter that draws 250 amps. Check whether the monitor supports multiple battery banks if you're running a dual-battery setup. Finally, test the app's responsiveness and data update frequency; some monitors refresh every few seconds while others lag by a minute or more.
Installation, Wiring, and Real-Time Data Tracking
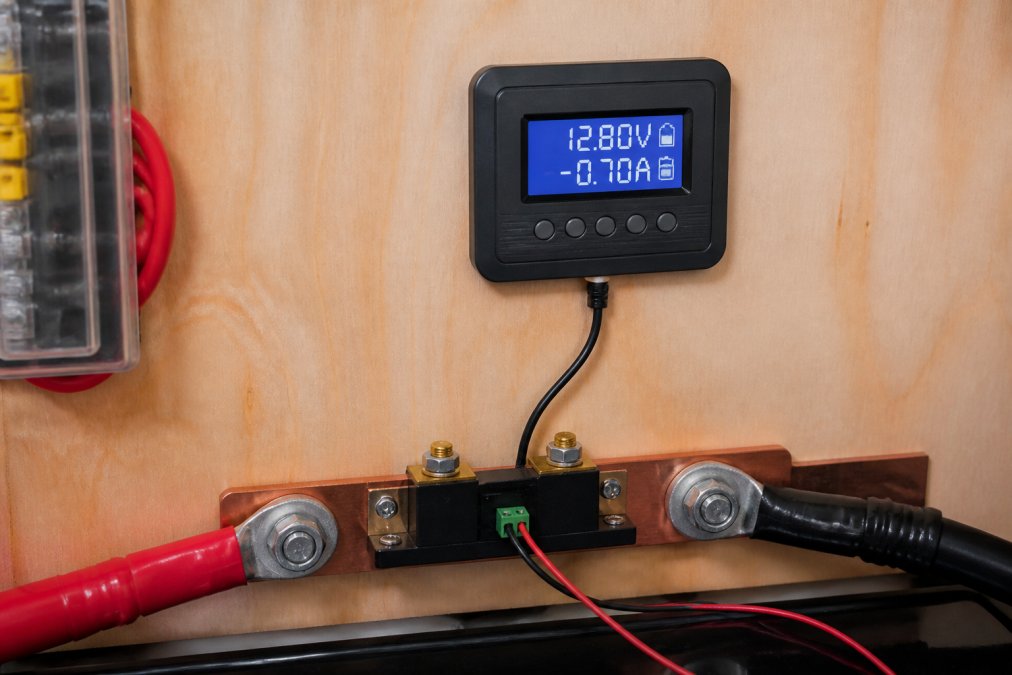
Proper installation determines whether your monitor delivers accurate readings or misleading data. The shunt must be installed in the negative return path from the battery, not on the positive side. Current flows from the battery positive terminal through your loads and charge sources, then returns through the shunt to the battery negative terminal.
Troubleshooting Common Monitoring Issues and Error Codes
Most monitoring problems fall into a few categories: incorrect wiring, calibration drift, display errors, or Bluetooth connectivity issues. Understanding how to diagnose these problems prevents panic when something seems wrong.
Frequently Asked Questions
What is the difference between shunt-based and voltage-based battery monitors?
Shunt-based monitors measure current flow directly through a precision resistor (shunt) placed in series with your battery bank, providing accurate state of charge and coulomb counting. Voltage-based monitors estimate state of charge by reading battery voltage, which is less accurate but simpler to install. For lithium systems running critical loads, shunt-based monitors are the standard because they track actual amperage draw and remaining capacity with precision that voltage-only systems cannot match.
How do I calibrate a battery monitor for lithium iron phosphate batteries?
Start with a fully charged battery at rest for at least 4 hours, then set your monitor's nominal voltage to match your LiFePO4 bank (48V for a 4-series setup, for example). Input the total amp-hour capacity of your battery bank, then perform a full discharge cycle while the monitor logs data. Once the battery reaches its minimum safe voltage (typically 2.5V per cell), reset the state of charge to 0% in the monitor. This calibration process teaches the monitor how your specific battery behaves, improving accuracy for future readings.
What features matter most in a Bluetooth battery monitor for RV use?
Look for real-time voltage and amperage display, state of charge accuracy within 1-2%, Bluetooth connectivity with a reliable mobile app, and data logging for historical analysis. The monitor should handle your system's amperage (common shunt ratings are 50A, 100A, 200A, and 500A), support integration with your charge controller and inverter, and offer clear alarm thresholds for low voltage or excessive discharge. For extended off-grid travel, choose a monitor that logs data locally so you can track battery health and usage patterns over weeks or months.
Can I integrate a battery monitor with my existing RV or boat electrical system?
Yes, most modern lithium battery monitors are designed to work with existing systems. The shunt installs between your negative battery terminal and the rest of your system, and the display unit mounts on any convenient wall or dashboard space. However, if your RV or boat has older wiring or mixed battery types, you may need to verify compatibility with your charge controller, inverter, and any DC-to-DC chargers. Contact Victron Guy's technical support team to confirm your specific setup before purchasing, they can assess your existing wiring and recommend any upgrades needed for safe integration.